Thursday, 12 July 2018

How to Add the Facebook "Like" Button to Blogger or WordPress

How to Add the Facebook "Like" Button to Blogger or WordPress

Facebook is currently the largest social media network on the Internet. Odds are your readers have a profile and can immediately start sharing your content with their friends and family. So, how can you get your readers to sing your praises without begging them to do so? Simple. Install the Facebook “Like” button on your blog.

When visitors to your blog click the "Like" button on your post, they share your content on their Facebook wall—instant advertising. You want more readers, more site traffic, and more exposure? This is a great way to do it.

Facebook Like Button

Thankfully, Facebook has made adding the "Like" button to a webpage incredibly user friendly. You don’t need to be coding guru to install this!

For Blogger Users

  1. Open your blog's dashboard.
  2. Click on Template.
  3. Click on Edit HTML.
  4. Click on Proceed when a warning telling you that "Directly editing HTML may affect the way some features work and is only recommended for advanced users." is displayed.
  5. Check Expand Widget Templates.
  6. Find this code using your browser's find function "<div class='post-body entry-content'>"
  7. Copy and paste the code given below right after it.
  8. <b:if cond='data:blog.pageType == &quot;item&quot;'><iframe allowTransparency='true' expr:src='&quot;http://www.facebook.com/plugins/like.php?href=&quot; + data:post.url + &quot;&amp;layout=standard&amp;show_faces=false&amp;width=100&amp;action=like&amp;font=arial&amp;colorscheme=light&quot;' frameborder='0' scrolling='no' style='border:none; overflow:hidden; width:450px; height:40px;'/></b:if>
  9. Click on Save Template.

Facebook Like
For WordPress

The three ways to add the Facebook “Like” button to your blog are:
1. Going directly to Facebook
2. Using a plugin
3. Manual coding

Going Directly to Facebook

Facebook has its own tool for creating a Like button using Extended Facebook Markup Language (XFBML). The Like button creation page can be found at Facebook's Developers page.

Benefits:
  1. XFBML was developed to work specifically with Facebook so it has some great bells and whistles, including real-time reports on when users click the Like button and providing users with the ability to add comments when clicking the button.
  2. The knowledge that your code will be correct.

Using a WordPress Plugin

WordPress Plugins are strings of code that have been created to expand the functionality of the software application. You can choose from hundreds of different WordPress plugins to add a Facebook Like button to your blog. The best approach is to review the documentation and user ratings of a plugin before adding it to your blog. However, keep in mind that a 3rd party plugin may limit the customization you can apply to the appearance and location of the Like button on your site. One such plugin can be found here.

Facebook Like WordPress Plugin

Benefits:
  1. Don’t have to deal with code at all.
  2. Depending on the plugin you choose, the Like button could be bundled with a number of other social buttons, minimizing the amount of time and effort you have to put into tracking down buttons for each service you want to connect to.

Manual Coding

If you have experience with PHP code editing, you can manually add the Facebook Like button to your WordPress blog. If you don’t know how to enter code but would like to learn how, WPBeginner has an excellent tutorial.

Benefits:
Offers the most control and customization of how buttons/social information displays.

All bloggers should consider installing the Facebook Like button on their blog. It doesn’t take any longer than 20 minutes to install, and it provides a quick and easy way for your readers to share your content.

Facebook's Recent Updates: Trying to fight off Google Plus

Gone are the days that Facebook was only available to college students. More and more people are joining daily and it seems the average age range is spanning in both directions. Users are now creating profiles at younger and older ages than ever before. So when it comes to social media, Facebook is king right? Well they are sure putting up one heck of a fight to stay on top.


Facebook vs Google Plus

Most recently, Google Plus had come along the social network scene giving Facebook a run for its money. What seems to attract many people to Google Plus is that it's the “shiny new toy,” so to speak and it seems to be more simplistic, and perhaps more intuitive, in its layout. As a result of these factors, Google Plus appears to be drawing in more users than other social media networks and really, should we be surprised? It seems Google has got a handle on doing a thing or two right when it comes to gaining a following.

So is this the beginning of the end for Facebook? Will it be similar to what Facebook did to MySpace?

Well, Facebook has been noticing this brand new social network rising up from the shadows, and as its result, it seems to be stepping up its game by creating some recent updates that will possibly fight back against its social media rival. Get ready ladies and gentlemen, the boxing gloves are on.

Google Plus Facebook Like

One of the most notable recent Facebook updates planned is the addition of an online video chat feature by adding the Skype Online Chat client function. While Google Plus also has this feature with multiple people chatting in one conference, Facebook plans to allow only two people converse in a video chat. Is this a strength or a weakness? It’s likely that time will tell when the results begin filling in. Many people are hoping that Facebook will raise the cap amount to more than two people in a single conference. While it hasn't been announced that Facebook is planning to raise the amount anytime soon, I guess only time will tell.

Another recent update is that Facebook has also added another new feature called Group Chat.

With the Group Chat feature, users can send a private message to as many friends or family that they want to communicate in a group without either starting up a new message for each friend or family member or even having to sign into Facebook's Instant Message feature. The Group feature is also great for starting up meeting appointments and many other tasks. This brand new feature has become a very popular and most used accessory in this social media platform to many.

Google Plus
These two updates seem to be the only real effective and recent updates that Facebook has announced, but as each day passes, it appears that Google Plus is beginning to dominate the competition altogether.

While Google Plus is slowly planning on adding new features in the possible future, who knows how the war between Facebook and Google Plus will really go down. But then again, don’t we all appreciate seeing an epic battle every now and again.

Cool Facebook Status, Chat Tricks and Tips

Cool Facebook Status, Chat Tricks and Tips

Most of us use Facebook to interact with some of our long separated friends but that does not mean we cannot have fun on Facebook. Here is a collection of tricks, tips and Easter eggs you can use to enjoy your experience on Facebook.

Facebook Easter Eggs: Pirate Language ,Turn Facebook Upside Down

Facebook is not as famous for its Easter eggs as Microsoft, but that does not mean that Facebook's Easter eggs are not entertaining. The one which I especially find interesting is the Pirate Language trick. To enable Pirate Language in Facebook, login to Facebook, click on the down arrow at the right of the top navigation bar, click on Account Settings, click on Edit at the right of the Language option, and in the Primary Language dropdown menu, select English(Pirate) located somewhere near the bottom and be the captain of your Pirate Ship.

Facebook tricks
Blabber t' yer mates

Similarly, you can also turn Facebook upside down by selecting English(Upside Down) from the Languages dropdown. This will flip the entire Facebook interface but your status updates would still be "normal".

Facebook Tips
See. Mark Zuckerberg does know how to headstand.


Chat on Facebook in your Firefox sidebar while browsing other Websites

To do this, you need to bookmark https://www.facebook.com/login.php. Then click on Show all Bookmarks (Manage Bookmarks in older versions) in the Bookmarks menu, then locate the newly created bookmark, single click on it, then click on more in the footer, then check Load this bookmark in Sidebar. Now, you can open that bookmark in Firefox's sidebar and keep on browsing other websites too.

Facebook chat

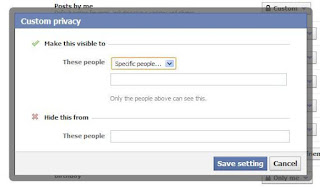
Show Facebook Status Updates only to Specific People or Hide them from someone

Facebook gives you the option to show your status updates to everyone or only your friends. You can further optimize Facebook so that your status updates are shown only to people you wish. Go to Privacy Settings by clicking the Settings icon at the right of the top navigation bar and clicking Privacy Settings. Then, in the Who can see my stuff? section, click on "Who can see your future posts?". Then, customize who you wish to show your posts by clicking on the down arrow that appears next to the Post button on the non-functional status update box. You can also hide your statuses from specific people by adding their name in the Hide from These section under Custom settings. You can also individually change the audience of your posts. Go to the post whose audience you wish to change and choose a different audience by clicking on the globe icon (which denotes that the post is public).

Hide Facebook Status

Hide your past posts so that only your friends can see them

Now you can also customize your past posts so that only your friends can see your past activity. To do this, open Facebook Privacy Settings and under the "Limit the Audience for Past Posts" option, select "Limit Old Posts."

Tag people in Status Updates, Wall Posts, Comments or Text

To tag someone in text in a manner that a link is created to the person's profile, use the @ symbol. eg. If you wish to tag John Jamison in your comment write @ John Jamison without any spelling mistake. If the person is in your friend list, a link in blue will be automatically created to the person's profile and he would be "tagged".
Tag Statuses Text Comments
Facebook text tagging in action


Write Upside Down, In Bubbles or Inverted Mirror-like text on Facebook

You might have seen many people update their Facebook status saying that "this was the last time they bought a keyboard on eBay" or "they have finally learnt how to update Facebook statuses while doing a headstand" written upside down. Here is how you too can flip text like that and add much more cool effects. Just go to Upside Down Text, uncheck Backwards effect, enter your text and copy the inverted one from the inverted text column and paste it in your status update or chats. You can also write inverted mirror like text by un-checking the upside down effect. To write in bubbles, click on the Bubble Ball text in the top Navigation bar.

e.g. Mirror Effect:- !rorrim a ni deppart ma I !oN hO

e.g. Upside Down Effect:- ɯɐp ʞǝʎqoɐɹp¡

e.g Both Mirror and Upside Down Effect:- ¡poפ ǝɯ dlǝH ˙ʎzɐɹɔ ƃuıʇʇǝƃ sı uıɐɹq ʎW

e.g. Text in Bubbles:- Ⓞⓗ Ⓝⓞ! Ⓜⓞⓡⓔ ⓑⓤⓑⓑⓛⓔⓢ

Why Facebook is Blue in Color?

Why Facebook is Blue in Color?

When you open Facebook, the first thing that you notice is the blue color it uses. Ever wondered why is Facebook so blue in color and not changing its color scheme?

Ever since they started as 'thefacebook', Facebook has stayed with the blue color. Although major changes have been made in the Facebook theme since then, the major unchanged thing has been the blue color.

facebook blue color
Facebook from its early days when it was known as  thefacebook

An exciting fact: In its earlier days, thefacebook.com required you to have an  .edu email id to join.

Everywhere from its login page to Facebook groups, you find only blue.

facebook is blue
Facebook Login Page. All Blue!

The reason for this is that  Mark Zuckerberg, the young founder of Facebook is red-green color-blind and blue is the richest colour for him which he confirmed in an online interview with Leo Laporte.

Another important commercial factor for using blue color is the fact that most colors tend to distract the viewers. Blue on the other hand acts as a transparent background to the main content as visible to the human brain due to which most popular websites tend to use the blue color. It can easily be called a webmaster's favorite color. Blue color is also sometimes referred to as 'Nirvana' for the brain.

All these factors make blue a prominent color on Facebook.

If you are bored with Facebook's blue theme and want a stylish theme, visit Change Facebook Theme.

Change Facebook's Theme, Color & Appearance

Change Facebook's Theme, Color & Appearance

Facebook is a social networking site which enables people to connect with friends and people around. That's how Facebook is usually introduced. However, Facebook is beyond the need of being introduced as almost everyone is on it. Despite its popularity, Facebook has one flaw; the default blue theme is really boring.

Some even consider it an annoyance while visiting Facebook. As Facebook does not allow users to change its theme like MySpace used to, users are left with no other option but to bear the theme Facebook wants them to use.

However, it is relatively easy to change the Facebook theme to a stylish one using an addon and custom themes which are available free of cost on the internet.

An example of the final outcome would be something like in the image.

Change Facebook Theme
This is the Ferrari theme. More themes are available for you to choose.


Requirement: The basic requirement for this to work is to have Mozilla Firefox or Google Chrome as your browser.

Steps to achieve this: If you use Google Chrome,  Mozilla Firefox users should carry out the following steps to successfully change Facebook theme.

  1. Open Mozilla Firefox and install 'Stylish' addon.
  2. Follow the basic steps to install the addon.
  3. Restart Firefox after successfully installing the Stylish addon.
  4. Login to your Facebook Account and click on the small 'S' button in your Firefox status bar.
  5. Click on "Find Styles for this Site" to open a new tab with free themes to use for Facebook.
  6. Click on any theme and a preview will be shown.
  7. If everything is fine in the previewed theme, click on "Install with Stylish" button at the top right corner of the page.
  8. A dialog box will open.
  9. Click on Install in the dialog box.

Steps for Google Chrome
  1. Install Stylish for Chrome from the Chrome Web Store.
  2. Navigate to Facebook.com and click on the S button.
  3. Click on "Find Styles for this Site" to open a new tab with free themes to use for Facebook.
  4. Click on any theme and a preview will be shown.
  5. If everything is fine in the previewed theme, click on "Install with Stylish" button at the top right corner of the page.

Stylish Button


facebook theme change

Install with stylish

Installing Ferrari theme for Stylish Firefox

Now whenever you open Facebook, it will show the theme that you have installed with Stylish instead of the boring old blue theme.

Download Facebook Account's Pictures and Data

Download Facebook Account's Pictures and Data

OK. So you are an active Facebook User. Imagine, just imagine, some grieved enemy of your reports your posts, and Facebook ends up deleting your account. How would you feel?
Ruined?

Well, not now. Facebook, the most popular social networking site, has a ways to tackle this situation. It does so by allowing you to download all your account information at the click of a button.

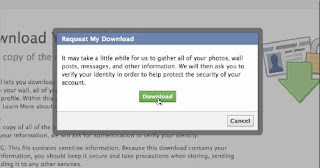
While this has been requested by users for years now, Facebook has very recently introduced the feature of downloading your Facebook account. The download is in the form of a zip file containing all your profile pictures, the photos you have been tagged in, wall posts and videos. Your messages, friend list, photos, events, likes (and almost everything you have ever uploaded on Facebook) is also included in the downloaded zip file. Upon unzipping the downloaded zip file, you will find a simple HTML file of your profile with offline links to the above stated things.

Downloading your account will not mean that Facebook will delete your profile. It will only serve as a backup and a leisure activity to give time to on Sundays.

Download Facebook Account Photo Videos

You can simply download your account by following the steps given below:-
  1. Login to Facebook.
  2. Click on the Settings icon at the right side of the top navigation bar.
  3. Navigate to Account Settings.
  4. Click on Download a copy of your Facebook data at the end of the page.

This link will only be available after Facebook has finished creating an archive of your account. They will send an email to you when the download is ready. This additional security measure has been wisely added by Facebook so that no one else downloads your personal information.

There is an expanded version of the archive that contains much more information, like the log of your Facebook login activity.

Although this is a good feature, Facebook offers no way to re-import this information from your hard drive to your account or to a new account, if you wish to create a new Facebook account containing all your old data.

Make your Computer Welcome You

Make your Computer Welcome You

Do you watch movies? Have you always loved the way how Computers in movies welcome their users by calling out their names? I bet that you too would want to know how you can achieve similar results on your PC and have a computer said welcome.

Then you are at the right place, this article describes exactly how you can make your computer welcome you like this.

With this trick, you can make your Computer welcome you in its computerized voice. You can make your Windows based computer say "Welcome to your PC, Username."

Make Windows Greet you with a Custom Voice Message at Startup

To use this trick, follow the instructions given below:-

  1. Click on Start. Navigate to All Programs, Accessories and Notepad.
  2. Copy and paste the exact code given below.
Dim speaks, speech
speaks="Welcome to your PC, Username"
Set speech=CreateObject("sapi.spvoice")
speech.Speak speaks
     3.  Replace Username with your own name.
     4.  Click on File Menu, Save As, select All Types in Save as Type option, and save the file as Welcome.vbs or "*.vbs".
     5.  Copy the saved file.
     6.  Navigate to C:\Documents and Settings\All Users\Start Menu\Programs\Startup (in Windows XP) and to C:\Users\ {User-Name}\AppData\Roaming\Microsoft\Windows\Start Menu\Programs\Startup (in Windows 10, Windows 8, Windows 7 and Windows Vista) if C: is your System drive. AppData is a hidden folder. So, you will need to select showing hidden folders in Folder options to locate it. If you have trouble locating the startup folder, press Windows key+R and type shell:startup in the Run dialog box and press Enter. The startup folder will open.
     7.  Paste the file.


 Make your Computer Welcome you at startup

Now when the next time you start your computer, Windows will welcome you in its own computerized voice.

Note: For best results, it is recommended to change sound scheme to No Sounds.
You can change the sound scheme to No Sounds by following the steps given below:-
  1. Go to Control Panel.
  2. Then click on Switch to Classic View.
  3. Then Click on Sounds and Audio Devices.
  4. Then Click on the Sounds Tab.
  5. Select No Sounds from the Sound Scheme option.
  6. If you wish to save your Previous Sound Scheme, you can save it by clicking Yes in the popup menu.
  7. Click on OK.
Change Sound Scheme to No Sounds

Try it yourself to see how it works. In my personal opinion, this is an excellent trick. Whenever I start my PC in front of anybody and the PC welcomes me, the fellow is left wondering how brilliant a computer do I have.

Disable USB ports on Windows PC via Registry

Disable USB ports on Windows PC via Registry

With this trick, you can disable access to your USB(Universal Serial Bus) ports on your Windows based PC to prevent people from taking out data without permission or spreading viruses through the use of USB (pen and flash) drives.

To use this trick to disable USB ports, follow the steps given below:-

  1. Click on Start.
  2. Click on Run. If you cannot find RUN, type it in the search box.
  3. Type "regedit" without quotes. This will launch the Registry Editor.
  4. Navigate to  HKEY_LOCAL_MACHINE\SYSTEM\CurrentControlSet\Services\usbstor.
  5. In the work area, double click on Start.
  6. In the Value Data box, enter 4.
  7. Click on OK.
  8. Close Registry Editor and refresh your desktop.
  9. To re-enable access to your USB ports, enter 3 in the Value Data box in Step 6.

Disable access to USB ports on your PC using Registry Editor

Try it yourself to make your PC invulnerable from data theft and malware which spread through USB ports. This works on Windows 10, Windows 8, Windows 8.1, Windows 7 and Windows XP.

Note: This trick also disables access to your USB connected peripheral devices. So, do not use it if you have USB connected keyboard and mouse.

Install Windows 10, 8, 8.1, or 7 from a Bootable USB drive

Install Windows 10, 8, 8.1, or 7 from a Bootable USB drive

Windows is sold in the form of DVDs and downloadable ISOs. The Windows DVD can be put into an optical drive for easy installation. However, with the advent of ultra portable devices and tablets that do not have optical drives, installing Windows from the setup DVD becomes a problem. The only solution for these devices is to install Windows from a USB device such as a flash drive.

There are many other reasons why despite having an optical drive, you might want a bootable USB device for installing Windows. One is that installing Windows from a flash drive is a lot faster than that from a DVD. Creating a flash drive for installing Windows is not as simple as copying the setup files to it as it will not be bootable. To make it bootable, you need to use special software.

There are many third party software to create bootable USB devices but given the fact that most people aren't comfortable with third party software, Microsoft has released an application called Windows 7 USB/DVD download tool. Although the program's name makes it feel that it only supports Windows 7, that isn't really the case. It works well for preparing a bootable USB device for installing Windows 8 as well. 

However, if you want to install Windows 8.1 or Windows 10 from a USB device, you need to use a third party tool called Rufus, as Microsoft's tool does not support Windows 8.1 and the newer Windows 10.

Install Windows from USB Flash drive

Before you begin, you must make sure that your flash drive has a storage capacity of at least 4GB (8GB for 64 bit). Also, you need to make sure that you have an ISO file of the Windows setup DVD with you. If you do not have the ISO file, then you need to create an ISO file from your setup DVD using a free program like ISOCreator.

See Steps for

1. Windows 10 and Windows 8.1
2. Windows 8 and Windows 7


Steps to Install Windows 10 and Windows 8.1 from USB flash drive

1. Download Rufus. The program runs perfectly on Windows 10, Windows 8, Windows 8.1, Windows 7, Windows Vista and Windows XP. Also, you need to be in an administrator account.

2. Start the program and locate your USB device in the Device: dropdown.

3. Give a name to your flash drive using the Volume Label option and leave all other settings unchanged. 

4. Check the Create a bootable disk using checkbox if it is not already checked. In the dropdown menu next to it, select ISO image. Click on the small button right to it to locate your Windows ISO image.

5. Click on Start to format your USB device and extract all files of the ISO to it. This will delete all data on your USB device so make sure that it does not contain any important files.

6. Now, you need to boot from the USB device you just created to start the Windows 8.1 installation process. If your computer doesn't boot from it, you might need to change the boot order. Also, you must note that older computers won't boot from a USB drive that is formatted as NTFS. To overcome this, you should make sure that your device is formatted as FAT32 and your hard disk has enough free space.

Steps to Install Windows 8 and Windows 7 from USB flash drive


1. Install Windows 7 USB/DVD download tool. To install this program, you need .NET Framework version 2.0 or higher installed on your computer. The program works on Windows 10, Windows 8, Windows 8.1, Windows 7, Windows Vista and Windows XP. Also, you need to be in an administrator account.

2. Open the program. Enter the location of your Windows ISO file in the source file box. Alternatively, you can browse to it and click Next. If at this step, you get an error saying "Invalid ISO file", you can use an alternate method to make a bootable USB flash drive. 

3. On the choose media type screen, select USB device to create a bootable Windows installation flash drive.

4. On the insert USB device screen, select your USB flash drive or the external hard drive to which you want to copy the setup files and click Begin copying. If your USB device does not have enough space, you will be shown a dialog box saying so. Click Erase USB device. This will format your USB device and delete all data on it.

Tip: If you accidentally delete the data in your USB device in the previous step, you could still recover it with free tools.

5. If everything goes right, you will see a Bootable USB device created successfully message on the next screen.

6. Now, you need to boot from the USB device you just created to start the Windows installation process. If your computer doesn't boot from it, you might need to change the boot order. Also, you must note that older computers won't boot from a USB drive that is formatted as NTFS which is what the Windows 7 USB/DVD download tool formats it into while you select Erase USB device option. To overcome this, you should make sure that your device is formatted as FAT32 and your computer has enough disk space.

If it complains that it is not a valid ISO file, you need to make sure that your Windows ISO is original and has not been modified in any way. If you are still unable to install Windows from a USB drive, just add a comment.

How to Cut Videos with VLC Media Player

VLC offers the option of using the Record button (as covered earlier) to allow users to save a portion of the video clip that is currently being played. However, the problem with using the Record button for cutting videos is that you need to actually play the entire portion of the video that you need. This makes it especially difficult to cut lengthy portions of a video. Moreover, exact start and stop times are difficult to maintain. This article offers a better way to cut videos with VLC media player that solves both these problems.

Video cutting

How to use VLC as a video cutting tool

To cut videos in VLC, follow the steps given below:-

1) Open VLC media player.
2) Play the video which you want to trim and note the time in the video from where you want to obtain the trimmed video and also note the end time up to which you want the video to be trimmed. Take the time in seconds. For example, if you want to start cutting from 2 minutes and 30 seconds and end cutting at 5 minutes and 4 seconds, the start time will be (60*2 + 30)=150 seconds and stop time will be (60*5 + 4) = 304 seconds. These values will be needed later.
3) Now, click on Media in the Menu bar.
4) In the dropdown menu, click on Convert/Save. Alternatively, you can press Ctrl+R shortcut key combination to directly reach media options.
5) Click on the Add button on the right of the File selection box to load the video which you want to cut.
6) Tick show more options on the bottom left side of the dialog box to show extended options.
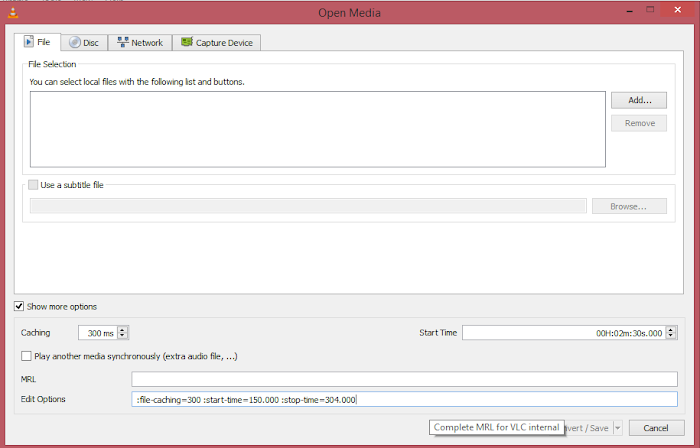
7) In the extended options, enter the start time which you noted earlier. Notice that in the Edit options field, a :start-time=### string will be added. There is not an option to add the stop time. So, you need to add the stop-time in the same format in the edit options manually, ie. add ":stop-time=###" without quotes in the edit options where ### is the stopping time in seconds. For our example, the edit option text field should look like that in the image given below:-

Cut Video

8) Click on Convert/Save on the bottom right side and follow all the steps to convert a video in VLC. To see the steps on how to convert a video, see this post.
9) In the following dialog box, click on browse to select the destination where your trimmed video will be saved.
10) Click on Start to begin the cutting process.

VLC's progress bar will show progress. Do not close the player at this stage as it will result in the output video getting corrupted.

Note: On some older PCs, after the cutting process is completed, VLC may become unresponsive. If that happens, just close VLC Media Player with the Task Manager. This will not affect the trimmed video.

The speed with which VLC cuts the video will depend upon your computer's specifications. A faster computer cuts quickly while slower PCs take a lot of time.

Formats supported:
VLC can be used to cut videos of all formats that it can play. This means that you can use VLC to cut videos of the following:-

Container formats: 3GP, ASF, AVI, DVR-MS, FLV, Matroska (MKV), QuickTime File Format, MP4, MPEG-2 (ES, PS, TS, PVA), Raw DV, MXF, VOB, RM, DVD-Video, VCD, SVCD, DVB

and

Video formats: Cinepak, Dirac, DV, H.263, H.264/MPEG-4 AVC, H.265/MPEG HEVC, HuffYUV, Indeo 3, MJPEG, MPEG-1, MPEG-2, MPEG-4 Part 2, RealVideo 3 & 4, Sorenson, Theora, VC-1, VP5, VP6, VP8, VP9, DNxHD, ProRes and some WMV.

How to Start Windows 10, 8(.1), 7 or XP in Safe Mode

How to Start Windows 10, 8(.1), 7 or XP in Safe Mode

Safe Mode is a special diagnostic mode in which Windows runs with the minimum amount of features. As the features are limited, Windows does not load unnecessary startup items and runs only those files and drivers that are necessary for the basic functioning of the operating system. This allows users to remove recently installed programs that might be preventing Windows from starting correctly. As Windows does not start unnecessary programs while in Safe Mode, it can also be used to remove viruses and malware without risking the infection getting worse.

Start Safe mode Windows
There are different ways in which you can get into the Safe Mode in Windows. They depend on the version of Windows you are using.

In this article:
  1. Steps for Windows 10, Windows 8 and Windows 8.1 users
  2. Steps for Windows 7, Windows Vista, Windows XP and previous versions
  3. Force Windows to start in Safe mode
  4. Which Safe Mode option should you choose?

Windows 10, Windows 8 and Windows 8.1

The F8 key method does not work on Windows 10, Windows 8 and 8.1. Hence, getting onto Safe Mode requires the following steps:-

If your PC is working properly:
1) On the Windows Start Screen/Menu, type Advanced.
2) Click on Advanced startup options.
3) Under the Advanced Startup heading at the bottom of the General Settings screen, click on Restart now.
4) Your computer will restart and you will be taken to the Advanced Startup Options menu. To easily reach this menu, on Windows start screen, you could choose restart while holding the Shift key.
5) Click on Troubleshoot and then on the Advanced Options button.
6) Now, click on Startup Settings.
7) At the Startup Settings Screen, click on Restart.
8) Your computer will restart to Advanced Boot options from where you can choose a Safe mode option based on your need.

Windows Safe mode

You can also force Windows to start in Safe mode.

If your PC is not working properly:
Windows monitors your PC's startup for problems and when an error is detected, it automatically takes you to the new Recovery mode with the message "Recovery. It looks like Windows didn't load correctly." In this case:-

1) Select Advanced Repair Options and then click on Troubleshoot.
2) Click on the Advanced Options button.
3) Now click on Startup Settings.
4) At the Startup Settings Screen, click on Restart.
5) Your computer will restart to Advance Boot Options from where you can choose a Safe mode option based on your need.

Windows 7, Windows Vista, Windows XP and Previous versions

If you are using these versions of Windows, you can try the following methods.

The Trusted F8 key method
1) Restart your computer if it is on.
2) Right before the system starts to boot, start tapping the F8 key continuously.
3) This should load the Windows Advanced Options boot menu.
4) Select a Safe Mode option based on your need using the arrow keys and press Enter.
5) Windows will start in Safe mode. To get out of Safe mode, simply restart your computer.

This method should work on Windows 7, Windows Vista, Windows XP, Windows 2003 and Windows ME. However, if it does not, you can always force Windows to boot in Safe Mode if your computer is working "properly".

Faulty Startup Method
If the F8 key method does not take you to the Advanced options boot menu, you could try turning your computer off when it boots into Windows. Upon next restart, Windows will notice that the computer did not boot successfully and take you to the Advanced Options boot menu. Then, select a Safe mode option based on your need. This method is risky and should only be tried as a last resort. It could result in some of your files being deleted which could make your Windows installation unusable.

Force Windows to restart in Safe Mode using the System Configuration Utility

Most users looking to boot Windows in safe mode will have a computer that is not working properly. Unfortunately, this method will not help them as it requires the user to have a working computer.

Start Windows in Safe mode

Steps:
1) Press Windows key+R to load the Run dialog box.
2) Type msconfig and press Enter.
3) This will start the System Configuration Utility.
4) On Windows 10, Windows 8, Windows 7 and Windows Vista, go to the Boot tab and tick Safe Boot. On Windows XP, go to the BOOT.INI tab and tick /SAFEBOOT.
5) Click OK.
6) Click on Restart in the following dialog box to boot into Safe Mode.
7) To start your computer normally, untick the Safe Boot option in the System Configuration Utility.

Your computer will restart in Safe mode.

Different Safe Mode Options. Which to choose?

These are the various safe mode options available in Windows. You can choose one based on the features you require.


Safe Mode
This is safe mode in its most basic form without any extra features. It is useful for troubleshooting most common problems .

Safe Mode with Networking
This offers additional support of connecting to the internet or any other network. This is useful when your PC has a problem which might require you to frequently use the internet to troubleshoot.

Safe Mode with Command Prompt
This option will allow you to use all the unique features of the Windows command prompt while in Safe mode

Convert FAT32 to NTFS using CMD

FAT 32 and NTFS are two kinds of file system. FAT 32 is widely used in different kinds of equipments, like hard disk, DVD player, game console and so on. At the same time, it supports the operating system of Windows XP, Linux, Mac, Android, and Windows Phone. However, there are several disadvantages of this type of file system. For example, 4GB is its maximum single file size and the limitation of partition capacity is 2TB.
NTFS has no limiting size of single files and it owns the top capacity of 256TB for partition size. Meanwhile, adding code or pressure for files is available. It is also highly recommended by Microsoft and Windows 7 and later OS are come with this file system. But still, it has few shortcomings. Many facilities, like the type of PS3 and Xbox game machine, do not support NTFS. What's more, it cannot be identified in the system of Android, Windows ME, etc.
If you want to save a movie with 10GB in your FAT 32 file system-based hard drive, what would you do? Would you want to separately keep it? No, it is too trouble. In this case, you may feel NTFS is a good assistant due to its features and advantages. Thus, converting FAT32 to NTFS is necessary.

Convert FAT32 to NTFS using CMD

Step 1: Go Star > All Programs > Accessories > Command Prompt.
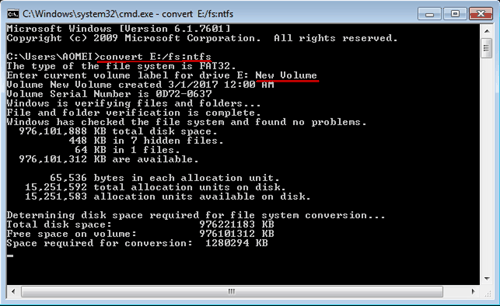
Step 2: In the command prompt window, type: convert drive_letter: /fs:ntfs. For instance, if you want to convert E drive from FAT32 to NTFS, type: convert E: /fs:ntfs and press Enter.
Step 3: Follow to prompt to enter current volume label for your drive E. Press Enter and the E drive will be formatted and changed to NTFS. 
convert E
This method only has few procedures and is easy for proficient. However, all data on the partition will be formatted. You can backup partition beforehand and do the converting yet it is too much time-consuming. Besides, this command prompt is not suitable for every user, especially for computer novice. Therefore, you need to find a tool to convert FAT32 to NTFS without losing data. AOMEI Partition Assistant Professional allows you to change file system between FAT32 and NTFS without formatting in Windows XP, Vista, 7, 8, 10.

How to convert FAT32 to NTFS and keep data?

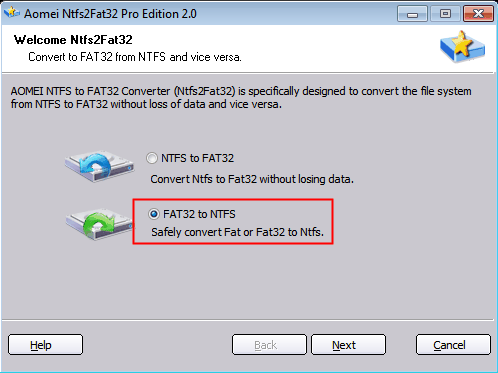
Step 1Download this AOMEI NTFS to FAT32 Convertor, install and run it. Select “FAT32 to NTFS". 
FAT32 to NTFS
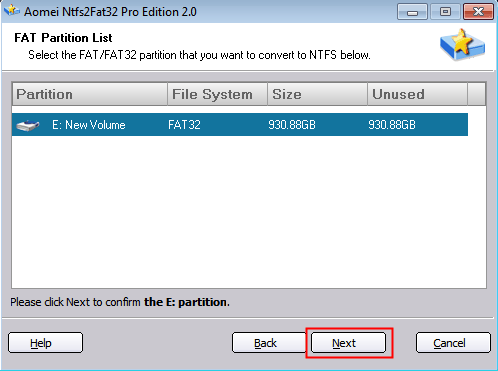
Step 2: Select the partition you want to convert from the list and click “Next”. It will start to convert immediately. Go back to Disk Management and check the file system.
FAT Partition List
Having done all of the procedures above, the conversion is OK. You needn't to reboot the computer. How convenient it is! Above methods can be used to convert FAT32 to NTFS on USB drive or external hard drive as long as they can be recognized by Windows. In fact, AOMEI Partition Assistant is also a great Gptgen alternative that you can used to convert disk between MBR and GPT. Now, download it to experience all of its features!

Edit Websites in Browser (Live)

                                        Edit Websites in Browser (Live) Imagine a world where you are a God and have ultimate control ...

ALL POST