Showing posts with label Windows10. Show all posts

Monday, 23 July 2018

Watch ASCII Star Wars in Windows XP, Vista, 7, 8 & 10

Watch ASCII Star Wars in Windows XP, Vista, 7, 8 & 10

Every one of us has watched Star Wars on television, computer or in a theater. It is the same movie with aliens fighting each other for galaxies and such stuff. There is nothing new in it. But wait, have you watched an ASCII (American Standard Code for Information Interchange) version of Star Wars and that too in Windows using telnet? A network protocol known only to computer wizards. Well if you have not, then you must do it now!

There is a complete copy of Star Wars done entirely in ASCII characters that you can watch in the Windowsoperating system (or any OS that supports telnet). The only thing required to watch it is an internet connection; speed does not matter.

A Picture showing Star Wars in command prompt

To watch it on Windows XP, Mac OS X and Linux
  1. Go to Start, Run. (Only for Windows users)
  2. Now type "telnet towel.blinkenlights.nl" without the quotes and press Enter. Users of Mac OS X and Linux can directly execute this code in the terminal window.

On Windows 10, Windows 8, Windows 8.1, Windows 7 and Windows Vista

Telnet is turned off by default in the latest versions of Windows. So, in order to watch star wars, you must first enable telnet by going to Control Panel › Programs › Turn Windows Feature On or Off and ticking both the telnet check boxes. After doing that, follow the steps given below:-
  1. Go to Start, Search in Windows Vista and Windows 7 and Windows 10. On Windows 8 and Windows 8.1, open the main Start page.
  2. Type telnet and press Enter.
  3. In the following command prompt window, type "o" without quotes and press Enter.
  4. Now type "towel.blinkenlights.nl" without the quotes and press Enter.
If you do not need telnet anymore, you can turn it off.

A command prompt window like the one in the image will open with the movie being played in it. See the movie yourself. Did you enjoy watching this new version of Star Wars? Well, I did and know it for sure that you would have too.

Thursday, 12 July 2018

Install Windows 10, 8, 8.1, or 7 from a Bootable USB drive

Install Windows 10, 8, 8.1, or 7 from a Bootable USB drive

Windows is sold in the form of DVDs and downloadable ISOs. The Windows DVD can be put into an optical drive for easy installation. However, with the advent of ultra portable devices and tablets that do not have optical drives, installing Windows from the setup DVD becomes a problem. The only solution for these devices is to install Windows from a USB device such as a flash drive.

There are many other reasons why despite having an optical drive, you might want a bootable USB device for installing Windows. One is that installing Windows from a flash drive is a lot faster than that from a DVD. Creating a flash drive for installing Windows is not as simple as copying the setup files to it as it will not be bootable. To make it bootable, you need to use special software.

There are many third party software to create bootable USB devices but given the fact that most people aren't comfortable with third party software, Microsoft has released an application called Windows 7 USB/DVD download tool. Although the program's name makes it feel that it only supports Windows 7, that isn't really the case. It works well for preparing a bootable USB device for installing Windows 8 as well. 

However, if you want to install Windows 8.1 or Windows 10 from a USB device, you need to use a third party tool called Rufus, as Microsoft's tool does not support Windows 8.1 and the newer Windows 10.

Install Windows from USB Flash drive

Before you begin, you must make sure that your flash drive has a storage capacity of at least 4GB (8GB for 64 bit). Also, you need to make sure that you have an ISO file of the Windows setup DVD with you. If you do not have the ISO file, then you need to create an ISO file from your setup DVD using a free program like ISOCreator.

See Steps for

1. Windows 10 and Windows 8.1
2. Windows 8 and Windows 7


Steps to Install Windows 10 and Windows 8.1 from USB flash drive

1. Download Rufus. The program runs perfectly on Windows 10, Windows 8, Windows 8.1, Windows 7, Windows Vista and Windows XP. Also, you need to be in an administrator account.

2. Start the program and locate your USB device in the Device: dropdown.

3. Give a name to your flash drive using the Volume Label option and leave all other settings unchanged. 

4. Check the Create a bootable disk using checkbox if it is not already checked. In the dropdown menu next to it, select ISO image. Click on the small button right to it to locate your Windows ISO image.

5. Click on Start to format your USB device and extract all files of the ISO to it. This will delete all data on your USB device so make sure that it does not contain any important files.

6. Now, you need to boot from the USB device you just created to start the Windows 8.1 installation process. If your computer doesn't boot from it, you might need to change the boot order. Also, you must note that older computers won't boot from a USB drive that is formatted as NTFS. To overcome this, you should make sure that your device is formatted as FAT32 and your hard disk has enough free space.

Steps to Install Windows 8 and Windows 7 from USB flash drive


1. Install Windows 7 USB/DVD download tool. To install this program, you need .NET Framework version 2.0 or higher installed on your computer. The program works on Windows 10, Windows 8, Windows 8.1, Windows 7, Windows Vista and Windows XP. Also, you need to be in an administrator account.

2. Open the program. Enter the location of your Windows ISO file in the source file box. Alternatively, you can browse to it and click Next. If at this step, you get an error saying "Invalid ISO file", you can use an alternate method to make a bootable USB flash drive. 

3. On the choose media type screen, select USB device to create a bootable Windows installation flash drive.

4. On the insert USB device screen, select your USB flash drive or the external hard drive to which you want to copy the setup files and click Begin copying. If your USB device does not have enough space, you will be shown a dialog box saying so. Click Erase USB device. This will format your USB device and delete all data on it.

Tip: If you accidentally delete the data in your USB device in the previous step, you could still recover it with free tools.

5. If everything goes right, you will see a Bootable USB device created successfully message on the next screen.

6. Now, you need to boot from the USB device you just created to start the Windows installation process. If your computer doesn't boot from it, you might need to change the boot order. Also, you must note that older computers won't boot from a USB drive that is formatted as NTFS which is what the Windows 7 USB/DVD download tool formats it into while you select Erase USB device option. To overcome this, you should make sure that your device is formatted as FAT32 and your computer has enough disk space.

If it complains that it is not a valid ISO file, you need to make sure that your Windows ISO is original and has not been modified in any way. If you are still unable to install Windows from a USB drive, just add a comment.

Sunday, 5 November 2017

Add Devices and Printers Context Menu in Windows 10


Add Devices and Printers Context Menu in Windows 10


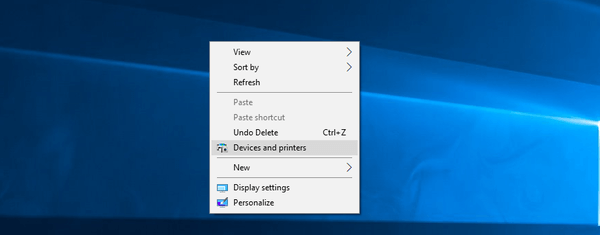
Devices and Printers is a special system folder which shows the important devices connected to your computer with fancy icons. This folder was first introduced in Windows 7. Windows 10 comes with this folder in the classic Control Panel. You can add a special context menu item, "Devices and Printers", to the Desktop in order to access this feature faster.
Devices And Printers Context Menu WIndows 10
The Devices and Printers folder provides a useful user interface to access and manage your peripheral devices. It shows advanced properties of devices and is able to download realistic looking images for printers, cameras, mice and keyboards. It also contains a number of quick actions in the context menu of a device. It also replaces the classic Printer folder.
For fast access to this useful folder, you might want to add Devices and Printers to the Desktop context menu. It will appear when you right-click the empty space on your Desktop. You need to sign in as Administrator before proceeding.
To add Devices and Printers to the Desktop context menu in Windows 10, do the following.

  1. Open the Registry Editor app.
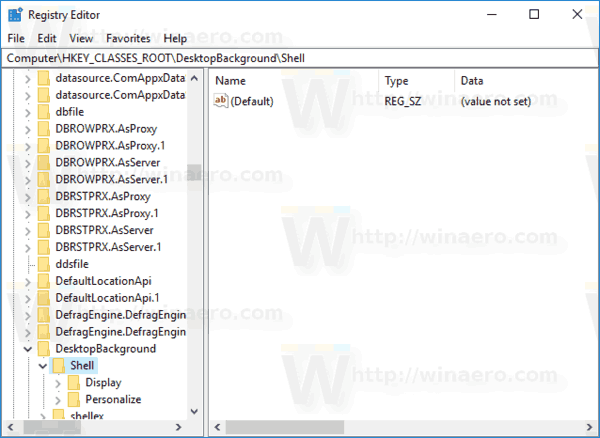
  2. Go to the following Registry key.
    HKEY_CLASSES_ROOT\DesktopBackground\Shell
    See how to go to a Registry key with one click.Devices And Printers Context Menu
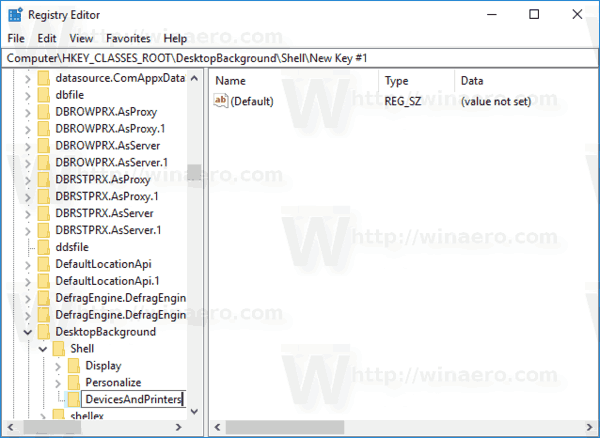
  3. Here, create a new subkey called "DevicesAndPrinters".Devices And Printers New Key
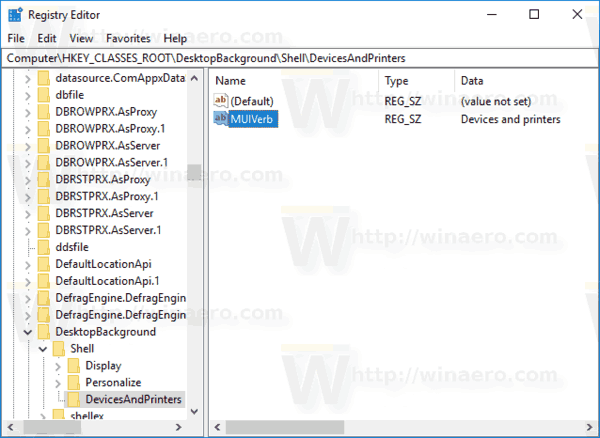
  4. On the right, create a new string (REG_SZ) called MUIVerb and set it to the line "Devices and printers".Devices And Printers Muiverb
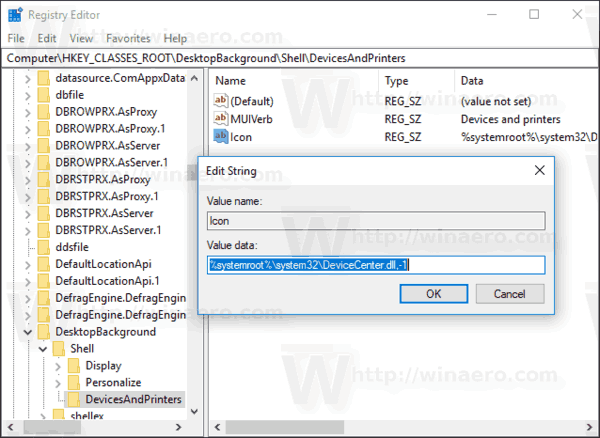
  5. Create a new string value "Icon" and set it to the following value:
    %systemroot%\system32\DeviceCenter.dll,-1
    Devices And Printers Icon
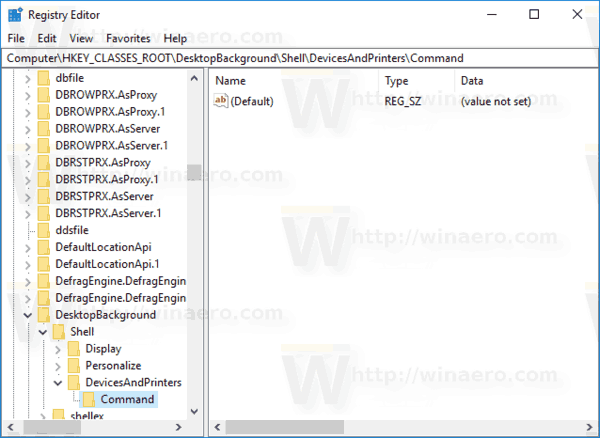
  6. Under the DevicesAndPrinters key you created, create a new subkey named "Command".Devices And Printers Command Subkey
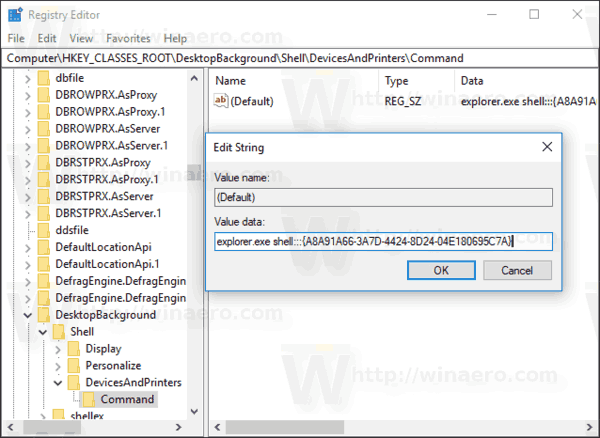
  7. On the right, modify the default (unnamed) parameter and set it to the following value.
    explorer.exe shell:::{A8A91A66-3A7D-4424-8D24-04E180695C7A}
    Devices And Printers Command Value
    The command above is special Active X (CLSID) command. Refer to the full list of these commands available in Windows 10: CLSID (GUID) shell location list in Windows 10
  8. Now, right-click on the empty space on your Desktop. You new command will be available there.Devices And Printers Context Menu WIndows 10
You are done!
To save your time, you can download the following ready-to-use Registry files.
Download Registry Files
You can add Devices and Printers to This PC if you want.
That's it.

Related Articles

  • Windows 10 Fall Creators Update Comes with Improved Search Indexing
  • Sign Out of OneDrive in Windows 10 (Unlink PC)
  • Add Users to Remote Desktop in Windows 10
  • Disable Pick Up Where I Left Off in Windows 10 Cortana
  • Change Search Index Location in Windows 10

Sign Out of OneDrive in Windows 10 (Unlink PC)


       Sign Out of OneDrive in Windows 10 (Unlink PC)


OneDrive is the online document storage solution created by Microsoft which comes bundled with Windows 10. It can be used to store your documents and other data online in the cloud. It also offers synchronization of stored data across all your devices. Today, we will see how to sign out of OneDrive.

OneDrive is bundled with Windows since Windows 8. It is the all-in-one solution built by Microsoft to provide the user the ability to have the same files on every PC he signs in with using his Microsoft Account. Previously known as SkyDrive, the service got rebranded some time ago.
The synchronization feature in OneDrive relies on Microsoft Account. To use OneDrive, you have to create one first. Besides OneDrive, Microsoft Account can be used to log in to Windows 10, Office 365 and most online Microsoft services.
In Windows 10, OneDrive has very close integration with the OS. Once you are signed in to Windows 10 using your Microsoft Account, it starts prompting you to use OneDrive cloud storage as the place to save files and documents by default. It can be used as your online backup solution. For those who prefer storing files on their local PC, there are options to not use OneDrive as the default save location. Also, you can uninstall it completely in that case as described in the article "An Official Way to Uninstall OneDrive in Windows 10".
To Sign Out of OneDrive in Windows 10, do the following,
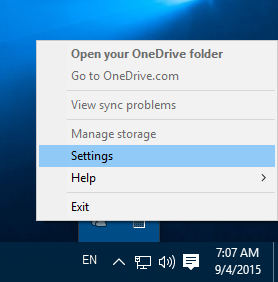
  1. Right click the OneDrive icon in the system tray to open its settings.
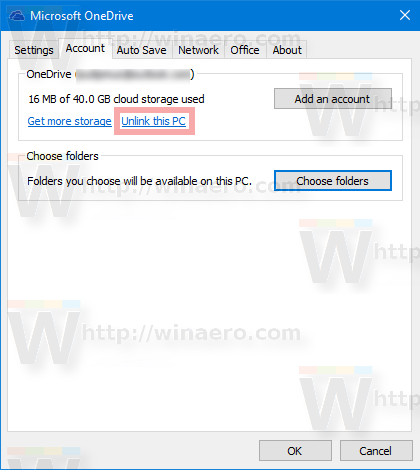
  2. Go to the Account tab and click on Unlink This PC as shown below.OneDrive Unlink The Account
  3. The OneDrive app will now be unlinked from this PC. It won't sync files to your OneDrive folder in Windows 10.
You are done! Later, you can sign-in to OneDrive again and link your PC, as follows.

To Sign In to OneDrive in Windows 10


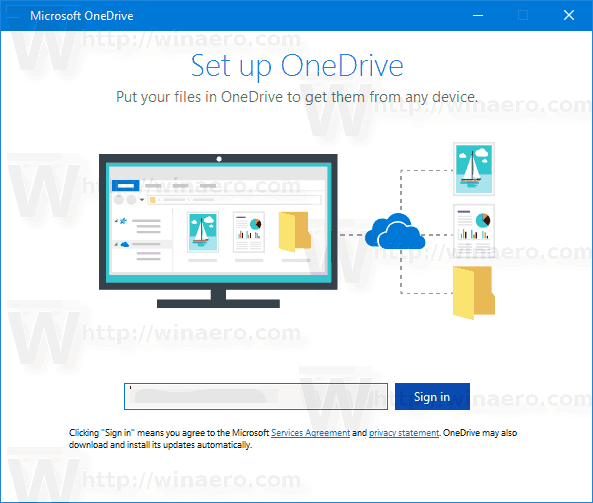
  1. Run OneDrive and set up your account.OneDrive Credentials
  2. Type your password when prompted.
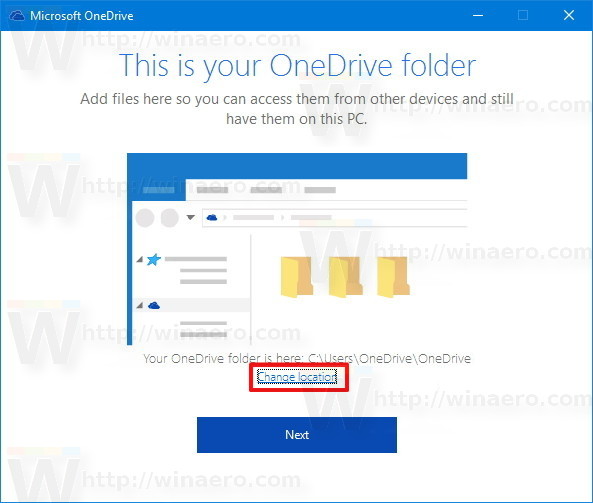
  3. On the next page, click the link Change location and specify the folder where you are going to store OneDrive files. You can use the default value here.OneDrive Change Location Link
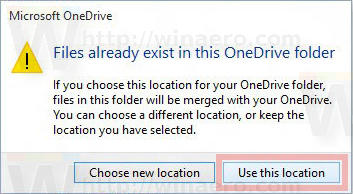
  4. If you set a custom folder, confirm your choice in the next dialog (click on the button Use this location). OneDrive Use This Location
  5. Finish your OneDrive app configuration and you are done.)

Add Users to Remote Desktop in Windows 10

         Add Users to Remote Desktop in Windows 10


In this article, we will see how to add or remove Remote Desktop users in Windows 10. This will allow them to make connections to the target computer over the Remote Desktop protocol. By default, only members of the Administrators group (e.g. administrative accounts) have access to RDP. Here we go.

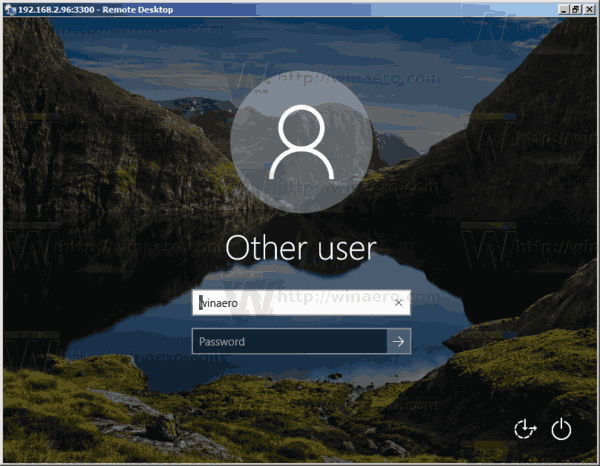
Connected With New RDP Port
Before we continue, here are some details about how RDP works. While any edition of Windows 10 can act as Remote Desktop Client, to host a remote session, you need to be running Windows 10 Pro or Enterprise. You can connect to a Windows 10 Remote Desktop host from another PC running Windows 10, or from an earlier Windows version like Windows 7 or Windows 8, or Linux. Windows 10 comes with both client and server software out-of-the-box, so you don't need any extra software installed.
First of all, enable the Remote Desktop feature as described here:
Now, you can configure user permissions.
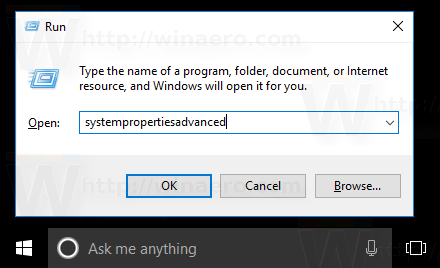
  1. Press Win + R hotkeys on the keyboard. The Run dialog will appear on the screen, type the following into the text box and press Enter:
    SystemPropertiesAdvanced
    System Properties Advanced In The Run Dialog
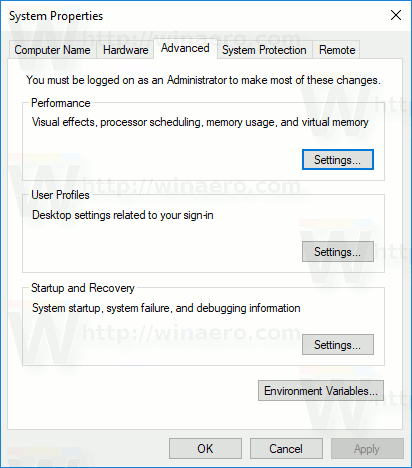
  2. Advanced System Properties will open.System Properties Advanced
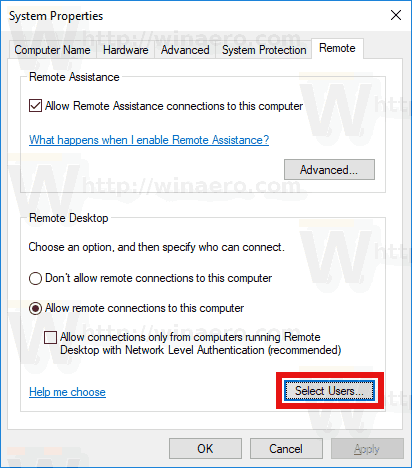
  3. Go to the Remote tab. There, click on the button Select Users.Select Users Button RDP
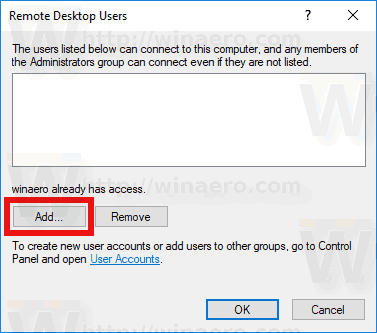
  4. The following dialog will open. Click on the Add button.Remote Desktop Users Dialog
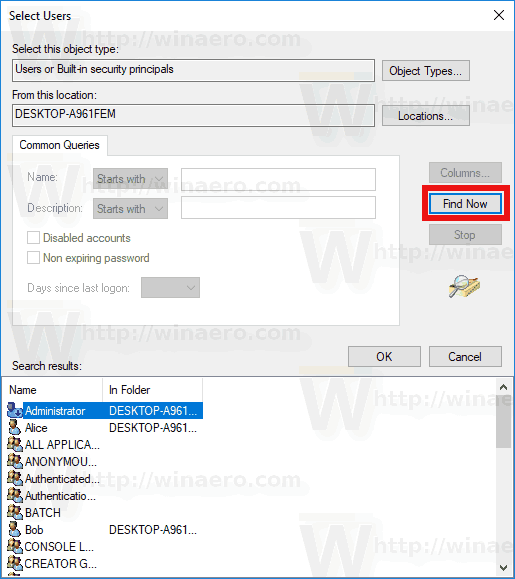
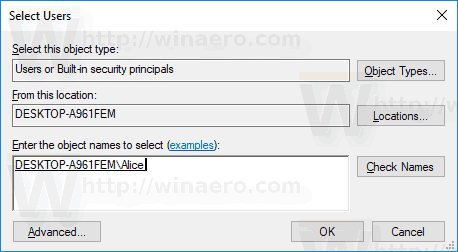
  5. The Select Users dialog will appear. There, type the desired user name to add or click on the Advanced button to select the user from the list. To populate the list, click on the Find now button in Advanced mode.Select Users Advanced Dialog
  6. Select the desired user in the list and click OK.User Selected
  7. Click OK once again to add the user.
You are done.

Alternative ways to add Remote Desktop users in Windows 10

There are two more ways to add or remove Remote Desktop users in Windows 10.

You can use Local Users and Groups snap-in

You can use Local Users and Groups snap-in if your Windows edition comes with this app.
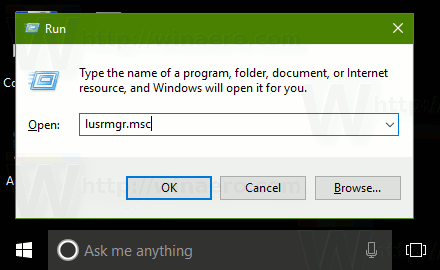
  1. Press Win + R shortcut keys on your keyboard and type the following in the run box:
    lusrmgr.msc
    Windows 10 Run Lusrmgr MscThis will open the Local Users and Groups app.
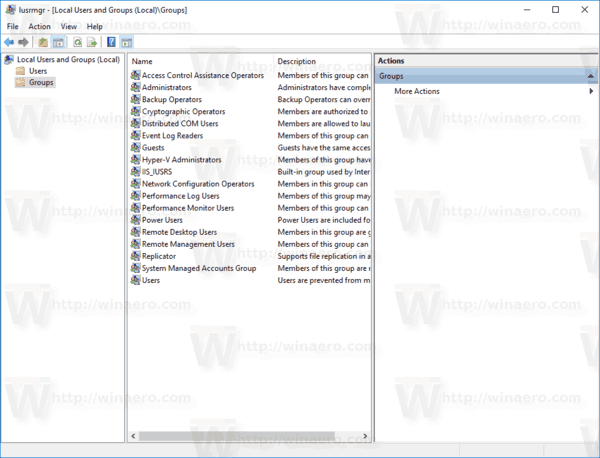
  2. Click on Groups on the left.Local Users And Groups
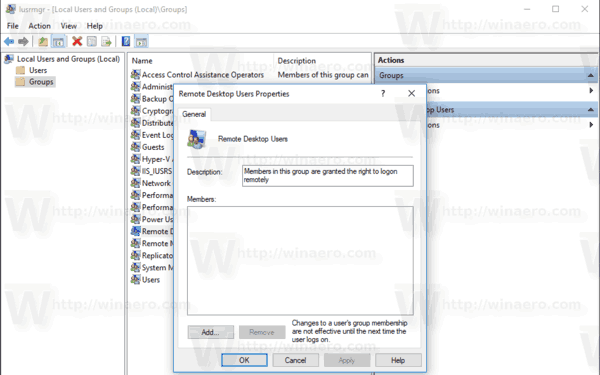
  3. Double-click "Remote Desktop Users" in the list of groups.Remote Deskop Users Group
  4. Click the Add button to add one or more users.
You are done.

You can the net.exe console tool

  1. Open an elevated command prompt.
  2. Type the following command:
    net localgroup "Remote Desktop Users" "UserName" /add
    Replace the "UserName" portion with the actual user account name you want to add to Remote Desktop users.
    In my case, the command looks as follows:
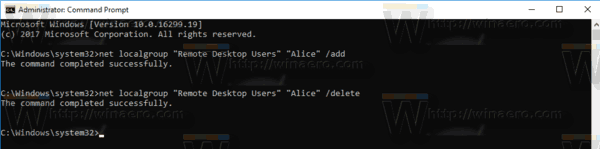
    net localgroup "Remote Desktop Users" "Alice" /add
  3. To remove a user from the "Remote Desktop Users", substitute the /add argument in the command above with the /delete switch, as follows:
    net localgroup "Remote Desktop Users" "Alice" /delete
See the following screenshot.Remote Deskop Net Command
Articles of interest:
  • Remote Desktop (RDP) Keyboard Shortcuts in Windows 10
  • Change Remote Desktop (RDP) Port in Windows 10
  • Connect To Windows 10 Using Remote Desktop (RDP)

How to Fix Problems with Windows 10

    How to Fix Problems with Windows 10

System Information:
Your machine is currently running:
PCRepair tool is compatible with your operating system.
Select Language:
Download Now
Problem:
Most computers begin to suffer stability problems with continued use, although to a different degree that may depend on different factors. Reduced stability that manifests itself in various PC errors may be caused by a wide array of issues, most of them related to the Windows registry and the damage it may have sustained.
Solution:
The most effective way to fix crashes and errors on a PC is with the help of special software that safely performs registry cleanup and repair, and tunes up system settings – download here
Ways to repair PC errors
Advanced PC users may be able to fix Microsoft Windows XP, Vista, Win 7 or 8 problems by manually editing the registry or removing individual keys found to be corrupt or invalid, as well as applying other manual PC bug fixes. Users may seek professional help from an IT technician, who can help avoid a full PC crash, fix PC power supply and other hardware, as well as clean the computer from issues that may be causing stability problems or general malfunctions. However, since any manipulations with the registry always carry a risk of rendering the operating system unbootable, whenever a user is in any doubt of their technical skills or knowledge, they should only use special software that provides safe PC fixes and is meant to fix system errors and other computer problems without requiring any special skills.

Safe way to fix PC errors:
Step 1: Click here to download the registry repair application
Step 2: Install and launch the application
Step 3: Click the Scan Now button to detect errors and abnormalities
Step 4: Click the Repair All button to fix the errors 


STEP BY STEP GUIDE

Step 1:
Download the PC repair tool
Step 2:
Install and launch the application
Step 3:
Click the "Scan now" button to detect errors and abnormalities
Step 4:
Click the "Repair All" button to fix the errors
Software Name:
TweakBit PCRepair
Total downloads:
1,500,000+
Download size:
7,6 Mb
Download time:
dsl: 5sec, dialup: 3min
Compatibility:
Win 10, 8, 7, Vista, XP
Requirements: 300 MHz Processor, 256 MB RAM, 50 MB HDD

PCRepair scans your computer for the following types of issues: invalid registry issues, fragmented files, internet connection settings, windows tweaks and unused services.

The free version enables limited proactive performance protection, while the full version, which can be bought for $29.95, lets you fix all speed issues and provides you with 4 proactive performance protection tools.

How to Use Cortana to Shutdown Windows 10

      How to Use Cortana to Shutdown Windows 10


Cortana is a digital assistant bundled with Windows 10. You can ask Cortana to look up information using your speech. The Redmond software giant added a number of new features for Cortana in the upcoming Fall Creators Update. One of them is the ability to restart, shut down, lock your PC and sign out from your user account.

Starting with Windows 10 Build 16251, you have the ability to use Cortana to turn off, restart, lock, or sign out of Windows. Microsoft describes it as follows:
While previously announced, we haven’t fully enabled it via the cloud until now. So, in case your hands are busy at the moment, you don’t have to stop what you’re doing to turn off or lock your PC. Instead, you can say “Hey Cortana, turn off my PC” and Cortana will take care of it. In a similar fashion, you can use Cortana to restart your computer, sign-out, or lock your PC. Just use your voice and try out the following commands:
“Hey Cortana, restart PC.”
“Hey Cortana, turn off PC.”
“Hey Cortana, sign out.”
“Hey Cortana, lock PC.”
For some of these voice commands, such as the one for turning off your PC, Cortana may ask you for a verbal confirmation. You’ll have to respond to Cortana with a "Yes" to complete the voice command.
In addition, you can also ask Cortana to execute the commands above on the Lock screen, but first you should enable Cortana on the Lock screen if you have not done so already. Here is how it can be done:
How to Enable Cortana on Lock Screen in Windows 10
For now, this feature is only available for English speakers (EN-US, EN-AU, EN-CA, EN-GB and EN-IN). As always, you can get it working in your region by changing it to United States but don't expect it to be available in your language in the near future.
So, what do you think about this feature? Are you excited about it? Tell us in the comments.

How to get the meaning of a word using Cortana


     How to get the meaning of a word using Cortana


Cortana is a digital assistant bundled with Windows 10. You can control it using voice commands or type into its search box to find various information from the web or automate certain tasks on your computer. Cortana can do many interesting things. One of the lesser known features of Cortana is the ability to find the meaning of a word. Here is how it can be used as a dictionary.
cortana logo bannerIn one of our previous articles, we already showed you a not-so-typical usage of the search box and Cortana in Windows 10. It allows you to perform basic calculations. Refer to the article here to see how to do that: Use Search for basic calculations in Windows 10.
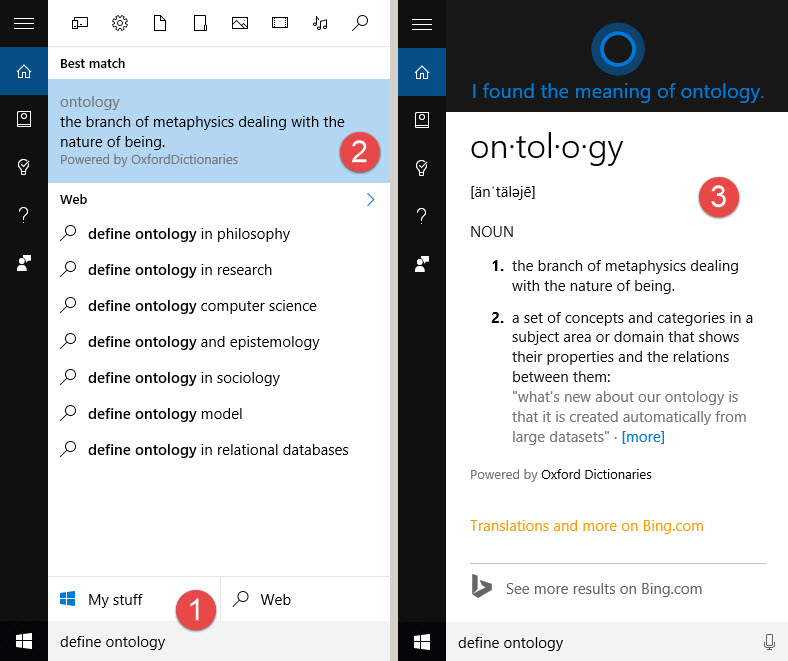
Cortana also lets you find the meaning of a word right from the search box on the taskbar. It works quickly and shows the results immediately after you type the following:
What does YOUR_WORD_HERE mean
You can also speak this if your PC has a microphone and the voice recognition feature of Cortana will show you the meaning of that word.
Once this is done, Cortana will show you the definition of the word that you asked for.
There is another shorter form of the text you need to type. Use the following query to ask Cortana:
define YOUR_WORD_HERE
See the following screenshot:cortana-secret-dictionary
The first result will show you a quick definition, which might be all you need in most cases. To see more details, click that quick definition or press Enter. That opens an expanded definition, and if that's not enough you can click to see the full definition in your web browser.
There is a catch though. Cortana is using its online backend to show you word definitions, i.e. the online part of Cortana needs to be enabled and connected to Microsoft servers to use this feature. If you are working offline or if you have disabled web search by disabling Cortana and kept only the local search feature on, this feature will not work in the search box.
Of course, instead of using Cortana, you can do the same with any search engine such as Google or Bing in a web browser(via ZDNet).

Useful text commands of Cortana you need to know

     Useful text commands of Cortana you need to know


Today, we will see how to save your time with Cortana in Windows 10. Using its search box and voice commands, you can perform a number of useful actions directly from the taskbar.

cortana logo banner
In our recent articles, we already showed you how to use it for basic calculations and how to get the meaning of a word using Cortana. These shortcuts are really useful. Here are a number of additional actions you can perform in the taskbar's search box.

Useful text commands of Cortana you need to know

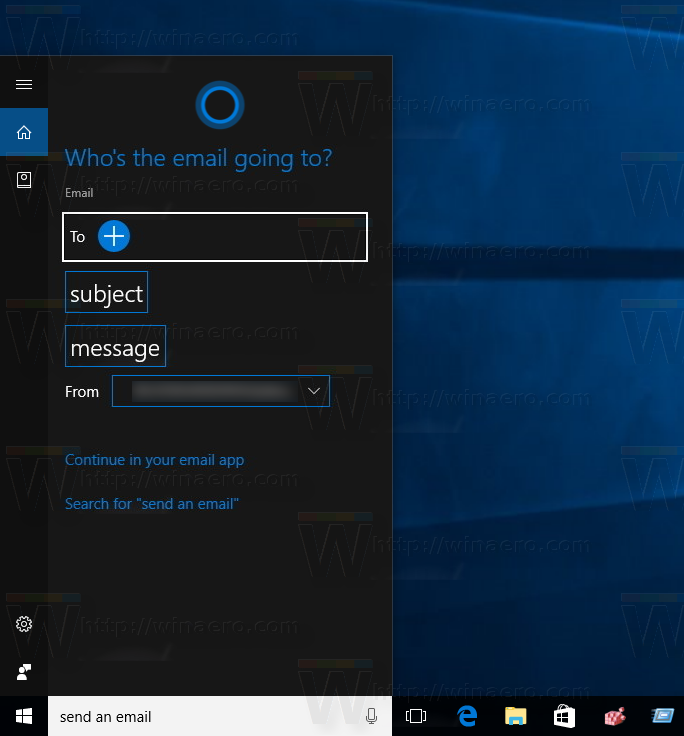
Send an email

Type send an email in the search box of the taskbar. Hit the Enter key and you will be able to fill a form to send an email quickly:send-an-email-cortana

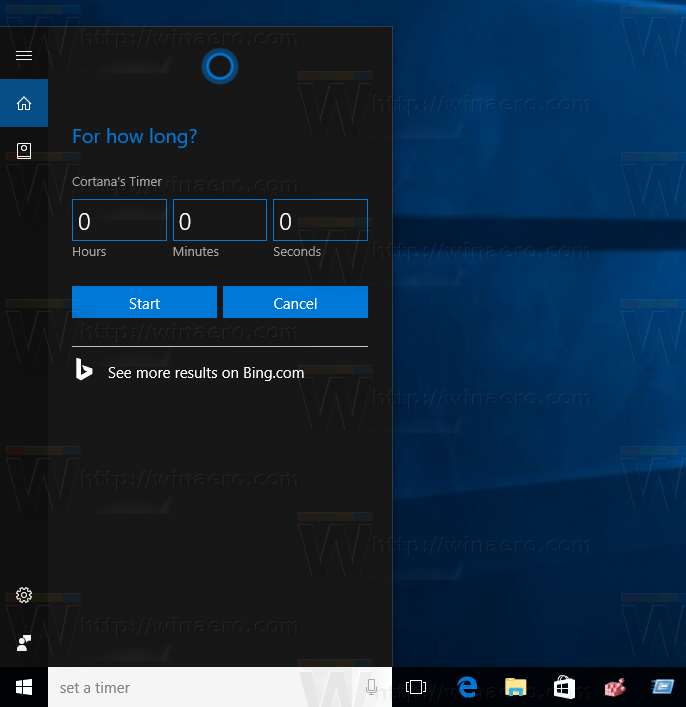
Set a timer

Another shortcut will allow you to set a new timer directly from the taskbar. Type set a timer in the search box in the taskbar and press Enter. Cortana will change its appearance to allow you to enter the timer details:cortana-set-a-timer
Give your timer parameters and you are done!

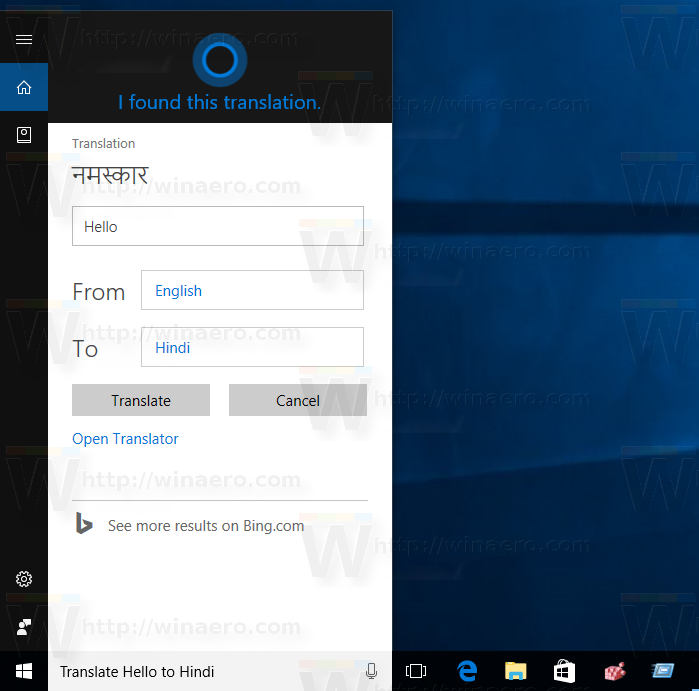
Translate words

You can use Cortana as a translator. Type translate and hit the Enter key. Now Cortana will have a translator UI:translate

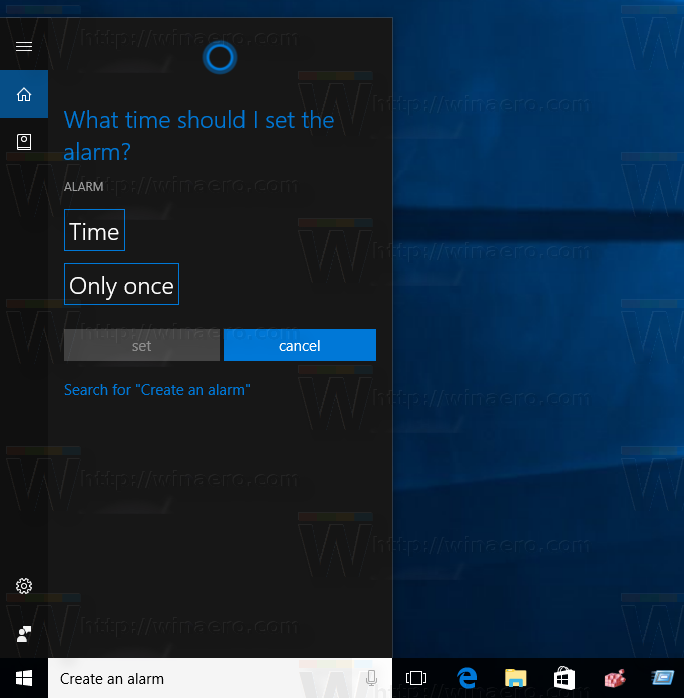
Create an alarm

You can quickly create a new alarm with Cortana. If you type create an alarm in the search box, then Cortana will allow you to set it directly from its user interface.create-an-alarm

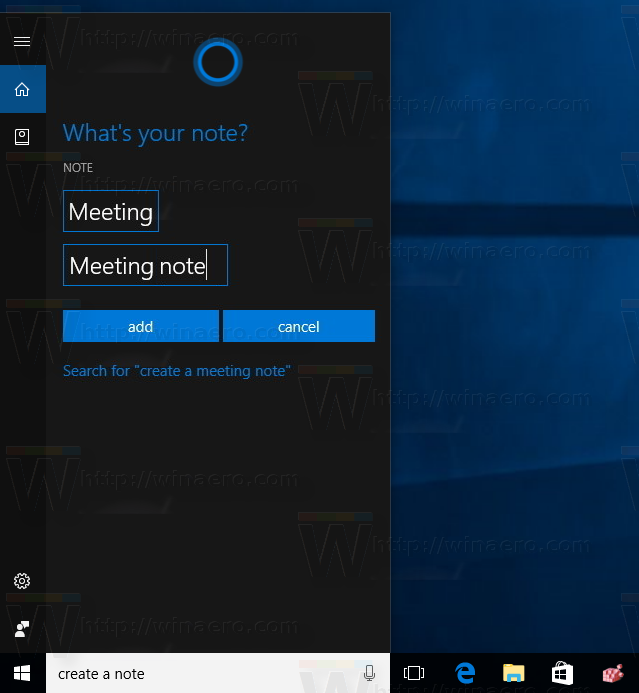
Create a note

Cortana allows you to create a new note the same way you create an alarm or set a timer. Type the command create a note and fill out the new note's details:create-a-note

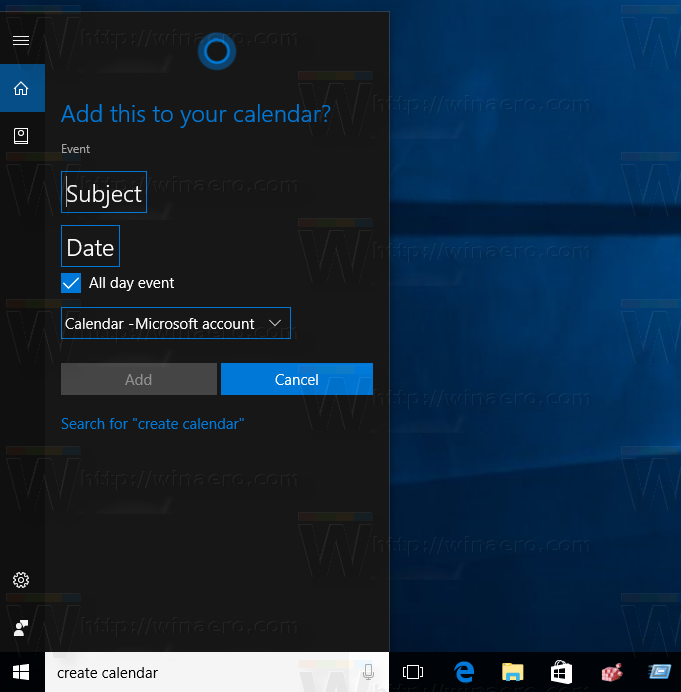
Create a calendar event

You can quickly create a new calendar event by typing create calendar in the search box of Cortana. The result will be as follows:new-calendar-event
If Cortana is enabled for your country and region, you can use similar voice commands. It will work as expected.
Know more Cortana tricks? Feel free to share them in the comments!

Disable Pick Up Where I Left Off in Windows 10 Cortana

    Disable Pick Up Where I Left Off in Windows 10 Cortana

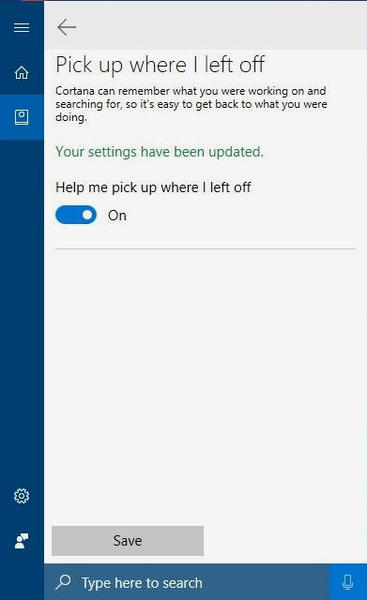
Cortana is a digital assistant bundled with Windows 10. You can ask Cortana to look up information using your speech. If you are running Windows 10 Fall Creators Update, Cortana comes with a "Pick up where I left off" feature. When enabled, it allows some of the apps you were running during the previous session to be restored automatically. When you switch between computers, Cortana can show quick links in the Action Center in order to help you reopen web sites and online documents that you were working on previously. If you find no use for this feature, or if you are annoyed by apps that relaunch automatically, you can disable it.


To disable "Pick up where I left off" in Cortana in Windows 10, do the following.
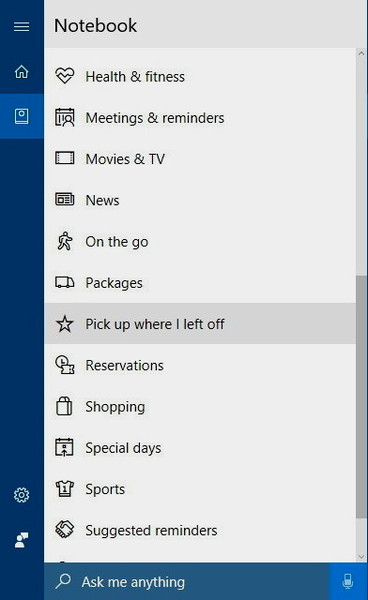
  1. Click on the Cortana text box or icon on the taskbar. If you have disabled them, then press the Win + S keys together to open Cortana.
  2. In the sidebar on the left, click the Notebook glyph icon.
  3. On the right, click on the item Pick up where I left off.Cortana Notebook Icon
  4. Disable the option Help me pick up where I left off.Pickup Where Left Off Cortana
  5. Click on the Save button.
This will disable the feature.
The next time you restart the OS, none of the apps you were using will start automatically. No Office documents will reopen. The Edge browser won't reopen, and Action Center notifications will disappear.
It is worth mentioning that many of the classic desktop (Win32) apps, especially third-party apps, may not work properly with this feature of Cortana. In order to get it working as expected, the user has to be signed-in with a Microsoft account. From my experience, it works best with Store apps and online documents opened in Office 365.
If you are using a Microsoft account, this feature can help you resume working quickly after a BSOD or an unexpected power loss. In other cases, it can be pretty annoying because users expect a fresh session after a logout or a restart. If you are using a local user account, this feature would not be useful.
More articles of interest:
  • Useful text commands of Cortana you need to know
  • Use Search for basic calculations in Windows 10
  • How to get the meaning of a word using Cortana
  • How to Use Cortana to Shutdown Windows 10
  • How to disable Cortana

Edit Websites in Browser (Live)

                                        Edit Websites in Browser (Live) Imagine a world where you are a God and have ultimate control ...

ALL POST