Sunday, 26 August 2018

Make your Computer Welcome You

Make your Computer Welcome You

Do you watch movies? Have you always loved the way how Computers in movies welcome their users by calling out their names? I bet that you too would want to know how you can achieve similar results on your PC and have a computer said welcome. 

Then you are at the right place, this article describes exactly how you can make your computer welcome you like this.

With this trick, you can make your Computer welcome you in its computerized voice. You can make your Windows based computer say "Welcome to your PC, Username."

Make Windows Greet you with a Custom Voice Message at Startup

To use this trick, follow the instructions given below:-

  1. Click on Start. Navigate to All Programs, Accessories and Notepad.
  2. Copy and paste the exact code given below.
Dim speaks, speech
speaks="Welcome to your PC, Username"
Set speech=CreateObject("sapi.spvoice")
speech.Speak speaks
     3.  Replace Username with your own name
     4.  Click on File Menu, Save As, select All Types in Save as Type option, and save the file as Welcome.vbs or "*.vbs".
     5.  Copy the saved file. 
     6.  Navigate to C:\Documents and Settings\All Users\Start Menu\Programs\Startup (in Windows XP) and to C:\Users\ {User-Name}\AppData\Roaming\Microsoft\Windows\Start Menu\Programs\Startup (in Windows 10, Windows 8, Windows 7 and Windows Vista) if C: is your System drive. AppData is a hidden folder. So, you will need to select showing hidden folders in Folder options to locate it. If you have trouble locating the startup folder, press Windows key+R and type shell:startup in the Run dialog box and press Enter. The startup folder will open.
     7.  Paste the file.


 Make your Computer Welcome you at startup

Now when the next time you start your computer, Windows will welcome you in its own computerized voice. 

Note: For best results, it is recommended to change sound scheme to No Sounds.
You can change the sound scheme to No Sounds by following the steps given below:-
  1. Go to Control Panel.
  2. Then click on Switch to Classic View.
  3. Then Click on Sounds and Audio Devices.
  4. Then Click on the Sounds Tab.
  5. Select No Sounds from the Sound Scheme option.
  6. If you wish to save your Previous Sound Scheme, you can save it by clicking Yes in the popup menu.
  7. Click on OK.
Change Sound Scheme to No Sounds

Try it yourself to see how it works. In my personal opinion, this is an excellent trick. Whenever I start my PC in front of anybody and the PC welcomes me, the fellow is left wondering how brilliant a computer do I have.

Cool Keyboard Tricks (Windows) : Make a Disco

Cool Keyboard Tricks (Windows) : Make a Disco

Keyboards usually have small LEDs which indicate whether different types of locks are activated or not. Here is a trick to use the lights of your keyboard in a more creative manner in Windows.

This trick uses a simple Visual Basic Script which when activated makes your Scroll lock, Caps lock and Num lock LEDs flash in a cool rhythmic way which gives the perception of a live disco on your keyboard.

Keyboard tricks

To make your own live disco, follow the steps given below:-

1. Open Notepad.
2. Copy paste the exact code given below:-

Set wshShell =wscript.CreateObject("WScript.Shell")
do
wscript.sleep 100
wshshell.sendkeys "{CAPSLOCK}"
wshshell.sendkeys "{NUMLOCK}"
wshshell.sendkeys "{SCROLLLOCK}"
loop
3. Save the file as Disco.vbs or "*.vbs".


Cool Keyboard Tricks

Double click on the Saved file to see the LED lights on your keyboard go crazy and make your own cool disco.

This trick has been tested on Windows XP, Windows Vista, Windows 7 and Windows 8 and found to be working perfectly.

You can disable the keyboard disco by starting Task Manager and ending the wscript.exe process.

Notepad Tricks: Cool Notepad tricks for Windows

Notepad Tricks: Cool Notepad tricks for Windows

Notepad, the text editor that comes bundled in Windows is an excellent tool for text editing. But that is not the only thing for which notepad is famous. It is also famous for its tricks and hacks. Here is a roundup of some of the best and coolest tricks that you can try using Notepad.

Matrix Falling Code Effect - Notepad CMD (.BAT) Tricks

Inspired by the movie Matrix, this falling code trick is extremely popular on social networking websites. Copy and paste the code given below in Notepad and save the file as "Matrix.bat" or *.bat. 

@echo off
color 02
:tricks
echo %random%%random%%random%%random%%random%%random%%random%%random%
goto tricks

Notepad tricks
Matrix Falling Code Effect - Notepad Trick

Upon running the bat file, you will see the "Matrix falling code" effect.

Make Your Keyboard Type (Any) Message Continuously-VBS Trick

This VBS trick can make any of your friend's keyboard type any message continuously. Open Notepad, copy the code given below and save the file as Tricks.vbs or *.vbs. You will need to restart your computer to stop this. Try this after closing all important programs.

Set wshShell = wscript.CreateObject("WScript.Shell")
do
wscript.sleep 100
wshshell.sendkeys "This is a Virus. You have been infected."
loop
Send this file to your friends as an email attachment to see the fun.


Notepad Virus

Create a Harmless Funny Virus with Notepad-Continuously eject CD/DVD drives

This VBS trick will create a code which will continuously eject all your connected Optical drives. If you put them back in, it will pop them out again. Copy this code and paste it in Notepad as Virus.vbs or *.vbs.

Set oWMP = CreateObject("WMPlayer.OCX.7")
Set colCDROMs = oWMP.cdromCollection
do
if colCDROMs.Count >= 1 then
For i = 0 to colCDROMs.Count - 1
colCDROMs.Item(i).Eject
Next
For i = 0 to colCDROMs.Count - 1
colCDROMs.Item(i).Eject
Next
End If
wscript.sleep 5000
loop

Double click to open this file and you will be impressed by this awesome trick.

Make a Personal Diary(Log) with Notepad (Easter Eggs)

Notepad Diary
Notepad Diary
You can use this trick to create a personal log with Notepad which will automatically include the current date and time before your note. To do so, open Notepad and type .LOG in capital letters and press Enter. Save the file. Now, every time you open this file, notepad will automatically insert the current time and date before the note. Just enter your note and save the file each time after making an entry.

All these Notepad tricks are totally harmless and would not harm your PC in any way.  To close any of the VBS trick given, open task manager and close the wscript.exe process. These tricks work on Windows 10, Windows 8.1, Windows 8, Windows 7, Windows Vista and Windows XP.

Windows 7 Tips, Tricks and Shortcuts to Increase Productivity

Windows 7 Tips, Tricks and Shortcuts to Increase Productivity

Windows 7 is not a new operating system, but it is new to many users. Windows 7 has several interesting new features that make this OS better than previous Windows versions. These tips for Windows 7 may not make you an expert, but they should make your experience with Windows 7 much more fun and productive.

Shake it up 

Windows Aero Shake in 7
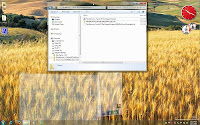
Windows 7's "shake" feature allows you to minimize all the windows on your desktop in only one step, leaving only the window you are working in. This is great if you often run multiple programs at once.
To use this feature, click and hold the title bar of the window you want to keep maximized. At the same time, use your mouse to shake it back and forth quickly. All the other windows will then minimize to the taskbar. If you want to get those windows back, just click on the tile bar and shake it again.

You don’t have to "shake" to do this. If you want to make this feature less fun, you can press the Windows Key and Home Key simultaneously.
  
Customize your taskbar

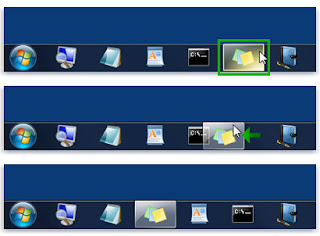
You can rearrange your taskbar buttons quite easily. You just drag an icon to where you want it to be. You can drag in icons from applications, the start menu, the desktop and pretty much anywhere else you can find them and “pin” them to the taskbar. If you get sick of an icon you can right click on them and “unpin” them.

Windows 7 taskbar tips

Use XP mode

There are lots of folks with old, yet important, software that isn’t compatible with this newer operating system. Thankfully, Windows 7 comes with “XP Mode,” which is essentially a virtual copy of this old OS that you can run on your desktop. This won’t work for all Windows 7 users however; only those with hardware virtualization built-in to their systems (and turned on) can use this feature.

Windows 7 XP Mode Tips

Shortcuts!!!!
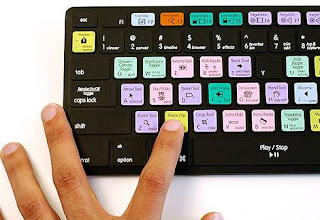
This is probably one of the most exciting new features for power users. If you are not a power user, you could turn into one soon with shortcuts. These are just some of the new shortcuts that can make your experience better and more productive with Windows 7:

- In Windows Explorer, you can bring up a preview pane on the right side of a window with ALT + P
- You can automatically open a new Explorer menu to show your libraries folder with Windows + E
- You can cycle through all open programs with the Taskbar’s peek menu by using Windows + T
- The Magnifier lets you zoom in or out on your entire desktop or even just a part of your screen. This feature only works when Aero desktop is enabled. You can activate the Magnifier by pressing Windows + (plus key)or Windows + (minus key)
- If a window is not maximized, you can fill your screen with it by pressing Windows + UP
- You can minimize an active window by pressing Windows + Down

Windows 7 shortcuts

Conclusion
These are just some tips for Windows 7. There are plenty more new features and shortcuts to explore. Hopefully these tips will make you more productive and let you have more fun with Microsoft’s most current operating system.

How to Fix a Slow Windows 7 Computer

How to Fix a Slow Windows 7 Computer

Most people love using Windows 7. That’s because it’s by far the nicest and the most productive Microsoft operating system to date. But there can still be glitches, errors, and lags. The good thing about Windows 7 is that it has lots of tools to troubleshoot and repair a slow computer. Here is a guide to where to find them and how to use them.

1. Problem Steps Recorder

fix slow computer windows 7
Problem Steps Recorder is a great solution to get a detailed description of the problem, so that you can either review the report yourself or send it to a tech support team. Basically, this tool records everything happening on the computer that needs troubleshooting. It records all mouse clicks and everything that is pressed on the keyboard, takes screenshots, and then saves the report as a zipped MHTML file. This file can be easily emailed and analyzed. To enable Problem Steps Recorder, click on Start, type PSR and hit Enter. Then click on Start Record. To save a report, just stop recording your computer activity.

2. Troubleshoot problems

If something in Windows 7 starts behaving in a weird way and you have no idea why, go to the Control Panel, locate the “Find and fix problems” (Troubleshooting) option and you’ll be able to access the Windows 7 troubleshooting tools. They are easy-to-use wizards and can fix common problems, clean your system, check your settings, and lots more. 

3. Discover bottlenecks

Under normal circumstances, Windows 7 easily outperforms Vista and XP. Nevertheless, your computer can still seem too slow from time to time. Most likely it’s an application or a process that’s slowing you down. Windows 7 makes it really easy to find bottlenecks with the help of Resource Monitor. Just click on Start, type RESMON and hit Enter to launch the tool. When it opens, click on the CPU, Memory, Disk and Network tabs to see which processes are hogging your system and using up your bandwidth. When you find the process that’s holding you back, you’ll be able to try to fix it right from the Resource Monitor. For example, if a process is locked up, right-click on it and select Analyze to see where the problem lies.

4. Repair your computer

If something goes seriously wrong and Windows 7 fails to start, it might be possible to repair your computer without the installation CD. Just boot your PC and press F8 during startup. You should see an option called Repair Your Computer. Select it and press Enter to see the recovery options Windows 7 has to offer.
These Windows 7 tools will help you troubleshoot and fix a slow computer in a quick and easy way. To prevent your computer from slowing down, use maintenance utilities like disk cleanup and defrag to keep your PC in top shape.

Also readTips to speed up a slow Windows computer

Get Missing Album Art In iTunes Automatically

Get Missing Album Art In iTunes Automatically

One of the disadvantages many of us who had MP3 collections before the trend of iTunes and Amazon MP3 is that many of the files lack album art. It’s annoying to browse through CoverFlow and see half your library with pretty pictures and the other half with a generic icon. Here’s a step-by-step guide to make iTunes search for album art for you.

iTunes Album Art
Find Missing Album Art Automatically in iTunes

1. If you haven’t already, download and install iTunes from Apple’s site.

2. During the initial set up, iTunes will encourage you to create an account. While you don’t have to make an account to use the application, you do need an account to search for album art. Creating an account is easy, free and only requires an active email address.

3. Wait for the initial set up to finish and import your music library. While this happens, ensure that you are logged in by clicking on the “Store” tab and seeing if it asks you to log in. If so, then you’ll need to enter your email and password. If not, you’re already logged in and can move on to the next step.

4. Once all of your music library has been entered into iTunes, click on the Music tab.

5. On the information directory, at the top of the application, click the tab that says “Advanced”

6. In the “Advanced” dialog box, click “Get Album Art Work”

7. The status bar will change to “Getting Album Artwork”. This may take a while depending on the size of your library.

8. After a little while, the status should change to “Downloading Album Artwork” . This again may take a while depending on your music library.

9. Change your view to “Cover Flow” and you will see all or most of the albums missing art work now have some.

This tutorial will work on devices running Windows and/ or Macintosh.

Edit Websites in Browser (Live)

                                        Edit Websites in Browser (Live) Imagine a world where you are a God and have ultimate control ...

ALL POST